Linux Kullanıcı İşlemleri
root kullanıcısını daha güvenli yapmak için gerekenler ve kullanıcı işlemlerinin Linux üzerinde nasıl yapıldığını anlatan bir makale...
Öncelikle size verilen kullanıcı adı ile sisteme bağlanın
passwd komutu ile root kullanıcı şifrenizi değiştirin
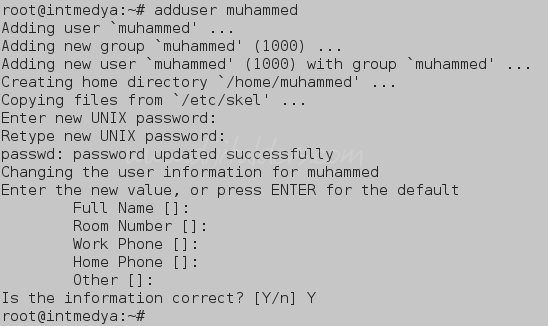
adduser komutu ile sisteme bir kullanıcı daha ekleyin

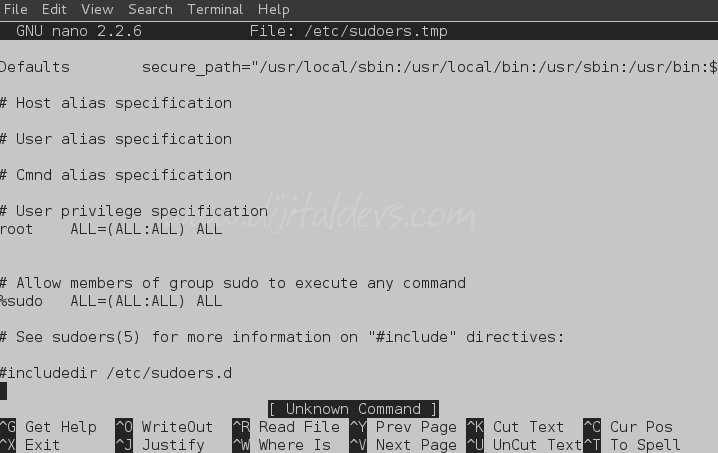
visudo uygulamasına girerek bu kullanıcıya ait yetkileri tanımlayın
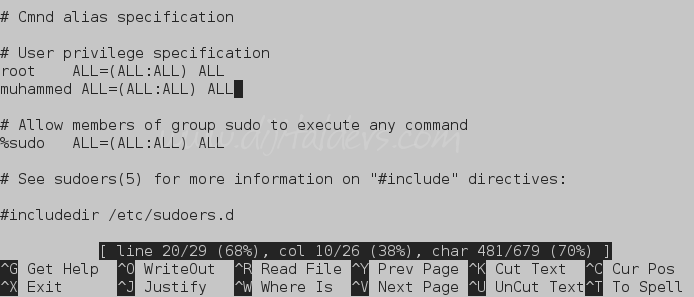
Visudo da aşağıdaki gibi olan satıra

root ALL=(ALL:ALL) ALL
Aşağıdakileri ekleyin

Aşağıdaki komutla herhangi bir kullanıcıyı sistemden silebilirsiniz
Tüm Klasör ve Mailleriyle kullanıcı silmek için:
Method 1: Linux useradd Command — Create User With Default Configurations
This is a fundamental low level tool for user creation. To create user with default configurations use useradd as shown below.
While creating users as mentioned above, all the default options will be taken except group id. To view the default options give the following command with the option -D.
GROUP=1001
HOME=/home
INACTIVE=-1
EXPIRE=
SHELL=/bin/sh
SKEL=/etc/skel
CREATE_MAIL_SPOOL=no
- GROUP: This is the only option which will not be taken as default. Because if you don’t specify -n option a group with same name as the user will be created and the user will be added to that group. To avoid that and to make the user as the member of the default group you need to give the option -n.
- HOME: This is the default path prefix for the home directory. Now the home directory will be created as /home/USERNAME.
- INACTIVE: -1 by default disables the feature of disabling the account once the user password has expired. To change this behavior you need to give a positive number which means if the password gets expired after the given number of days the user account will be disabled.
- EXPIRE: The date on which the user account will be disabled.
- SHELL: Users login shell.
- SKEL: Contents of the skel directory will be copied to the users home directory.
- CREATE_MAIL_SPOOL: According to the value creates or does not create the mail spool.
Example 1: Creating user with all the default options, and with his own group.
Following example creates user ramesh with group ramesh. Use Linux passwd command to change the password for the user immediately after user creation.
# passwd ramesh
Changing password for user ramesh.
New UNIX password:
Retype new UNIX password:
passwd: all authentication tokens updated successfully.
# grep ramesh /etc/passwd
ramesh:x:500:500::/home/ramesh:/bin/bash
# grep ramesh /etc/group
ramesh:x:500:
[Note: default useradd command created ramesh as username and group]
Example 2: Creating an user with all the default options, and with the default group.
# grep sathiya /etc/passwd
sathiya:x:511:100::/home/sathiya:/bin/bash
# grep sathiya /etc/group
[Note: No rows returned, as group sathiya was not created]
# grep 100 /etc/group
users:x:100:
[Note: useradd -n command created user sathiya with default group id 100]
# passwd sathiya
Changing password for user sathiya.
New UNIX password:
Retype new UNIX password:
passwd: all authentication tokens updated successfully.
[Note: Always set the password immediately after user creation]
Example 3: Editing the default options used by useradd.
The following example shows how to change the default shell from /bin/bash to /bin/ksh during user creation.
# useradd -D
GROUP=100
HOME=/home
INACTIVE=-1
EXPIRE=
SHELL=/bin/bash
SKEL=/etc/skel
[Note: The default shell is /bin/bash]
# useradd -D -s /bin/ksh
# useradd -D
GROUP=100
HOME=/home
INACTIVE=-1
EXPIRE=
SHELL=/bin/ksh
SKEL=/etc/skel
[Note: Now the default shell changed to /bin/ksh]
# adduser priya
# grep priya /etc/passwd
priya:x:512:512::/home/priya:/bin/ksh
[Note: New users are getting created with /bin/ksh]
# useradd -D -s /bin/bash
[Note: Set it back to /bin/bash, as the above is only for testing purpose]
Method 2: Linux useradd Command — Create Users With Custom Configurations
Instead of accepting the default values (for example, group, shell etc.) that is given by the useradd command as shown in the above method, you can specify custom values in the command line as parameters to the useradd command.
- -s SHELL : Login shell for the user.
- -m : Create user’s home directory if it does not exist.
- -d HomeDir : Home directory of the user.
- -g Group : Group name or number of the user.
- UserName : Login id of the user.
Example 4: Create Linux User with Custom Configurations Using useradd Command
The following example creates an account (lebron) with home directory /home/king, default shell as /bin/csh and with comment “LeBron James”.
# grep lebron /etc/passwd
lebron:x:513:0:LeBron James:/home/king:/bin/csh
Note: You can give the password using -p option, which should be encrypted password. Or you can use the passwd command to change the password of the user.
Method 3: Linux adduser Command – Create Users Interactively
These are the friendlier tools to the low level useradd. By default it chooses the Debian policy format for UID and GID. A very simple way of creating user in the command line interactively is using adduser command.
Example 5: Creating an User Interactively With adduser Command
Adding user `spidey' ...
Adding new group `spidey' (1007) ...
Adding new user `spidey' (1007) with group `spidey' ...
Creating home directory `/home/spidey' ...
Copying files from `/etc/skel' ...
Enter new UNIX password:
Retype new UNIX password:
passwd: password updated successfully
Changing the user information for spidey
Enter the new value, or press ENTER for the default
Full Name []: Peter Parker
Room Number []:
Work Phone []:
Home Phone []:
Other []:
Is the information correct? [y/N] y
Method 4: Linux newusers Command — Creating bulk users
Sometimes you may want to to create multiple users at the same time. Using any one of the above 3 methods for bulk user creation can be very tedious and time consuming. Fortunately, Linux offers a way to upload users using newusers command. This can also be executed in batch mode as it cannot ask any input.
This file format is same as the password file.
Example 6: Creating Large Number of Users Using newusers Command
If Simpson family decides to join your organization and need access to your Linux server, you can create account for all of them together using newusers command as shown below.
homer:HcZ600a9:1008:1000:Homer Simpson:/home/homer:/bin/bash
marge:1enz733N:1009:1000:Marge Simpson:/home/marge:/bin/csh
bart:1y5eJr8K:1010:1000:Bart Simpson:/home/bart:/bin/ksh
lisa:VGz638i9:1011:1000:Lisa Simpson:/home/lisa:/bin/sh
maggie:5lj3YGQo:1012:1000:Maggie Simpson:/home/maggie:/bin/bash
Note: While specifying passwords for users, please follow the password best practices including the 8-4 password rule that we discussed a while back.
Now create accounts for Simpsons family together using the newusers command as shown below.
Kaynak:
- https://www.digitalocean.com/community/articles/initial-server-setup-with-ubuntu-12-04
- http://www.thegeekstuff.com/2009/06/useradd-adduser-newuser-how-to-create-linux-users/
- http://www.computerhope.com/unix/userdel.htm


